Build-Ups - Teacher’s Notes
Acetate Overlay versions
The essence of these activities is that images representing given facts are used to ‘build up’ new geometrical properties.
Each layer of the build-up contains a given fact to be shown on the diagram; for example, angles on a straight line add to 180°.
Mathematical conventions are introduced; for example, arrows are marked on parallel lines.
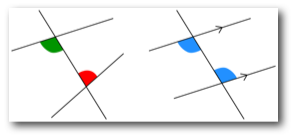
General definitions are also established. For example, alternate angles are defined by their positions relative to a transversal and a pair of non-parallel or parallel lines, as shown in the diagram.
As the layers build up, given facts are recorded and these can then be used in subsequent build-ups.
How do I use the build-up diagrams?
- Begin with whole-class demonstration of the build-ups.
- Using tracing paper, ask pupils to repeat the process, initially reconstructing the previous proof and then completing other build-ups
- Successive figures are carefully positioned on top of earlier ones to create the ‘picture’. Necessary conventions are marked, known facts highlighted and practised and consolidated by pupils.
- When the build-up is complete, it is a good idea to use a final sheet to replace the individual overlays. Consider this as a ‘freeze frame’ of the picture you have just built up.
- Reconstruct with the pupils the reasoning, highlighting definition of terms and conventions.
- The diagrams can be printed onto acetate using the supplied template.